2 Cats and Chloe

a lifestyle blog: clean eats, adventures and glitter

  • About
    • Contact
  • Clean Eats
    • Whole30 Approved
    • Paleo
    • Gluten Free
  • Travels + Adventures
    • Virginia is for lovers
  • Glitter
    • Organic Hair Care
    • Home Decor
    • Celebrations
    • My Wedding
    • We’re Pregnant!
    • diy
    • #whatsuziewears
    • Things I Love.
    • Holidays
  • Work With Me
    • Blog + Branding Consults

I Heart Yardsale Projects!

June 2, 2011 by Susan Leave a Comment

Knowing that it was drill weekend and that my boyfriend would be working and MIA for a couple days, I woke up with a goal and a huge need for a new crafting project.  I have seen on numerous blogs that I follow how some folks will head to yard sales or thrift stores with a mission and a vision, while others just kind of wing it and hope they find something awesome.  I was pretty much in the middle… I had a mission of finding a project (or two) but had no idea of what/where/when/who/why or how I was going to accomplish that mission.

The weekend before Memorial Weekend just so happens to be one of the busiest weekends for yard sales!  It was like I hit the yard sale jackpot!  Every corner had a sale of some sort!  Luckily a friend had posted something on facebook that her street was having a multi-family charity “jackpot” yard sale.  So I headed that way.  I was in luck!  Right when I walked up they made the announcement that everything was half off whatever (already low) price that was on it.  SCORE!  
I got myself a few things (read “a few projects.”)  First I found a pair of ugly shoes for a dollar.  I think I can make them pretty… Stay tuned for that project.  I got a pair of large, wooden lamps for $6.  I was highly disappointed to get home and realize that one of them is broken… I really wanted to paint them and make a set.  I might try to fiddle with it in the future, who knows.  But my favorite steal of the day was the small table and mirror set.  $10 for the set.  It sounds so much better though to say $5 for a table and $5 of a larger mirror.  
The table has already been crafted and hopefully when I have a couple hours the mirror will be ready to match it.  Here’s what I did… let me know what you think!

:(  My computer LOST the before photo of the table… stupid computer.  It was a crappy, cheap looking finish, so just pretend you saw it! 
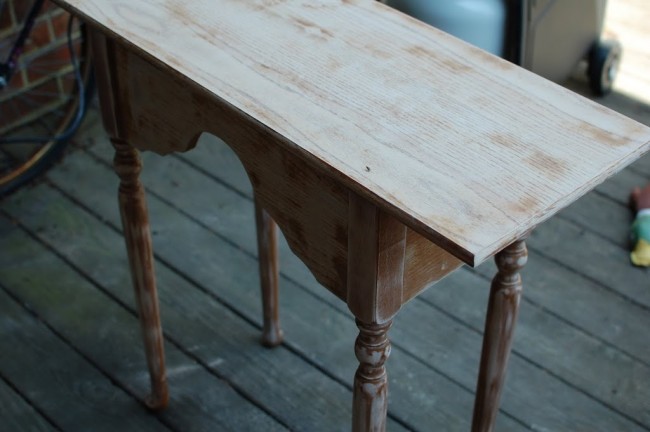
After sanding off the old finish!

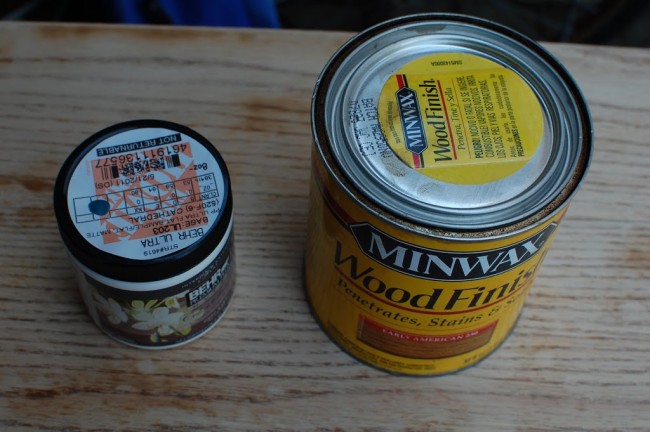
I got a sample paint from home depot and borrowed the stain from my dad’s garage.

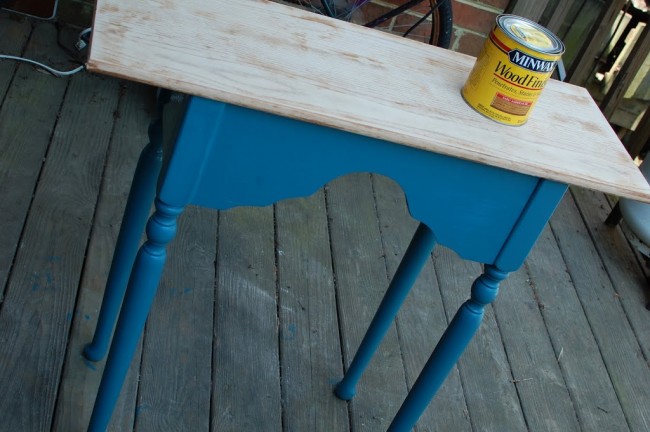
First I painted the bottom part - it was actually a little lighter than I expected it would be.

Then I stained the surface.

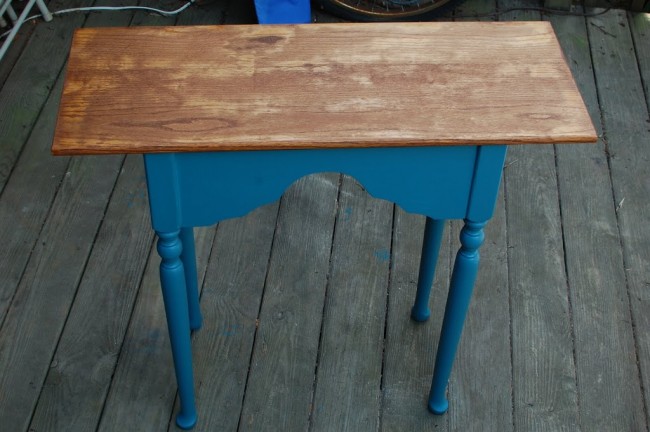
It’s not the most fancy table, but for $5 and some paint, what do you expect?!  I think it turned out quite cute!  Right now it is sitting in my kitchen near the bay windows until I take it to my boyfriends house.  Sadly, I am pretty much out of space for projects… good thing he just bought a new house that needs decor!! :)

Filed Under: Crafting, diy

Scrapbooking Gone Digital!

May 11, 2011 by Susan Leave a Comment

Let’s talk about how we preserve our memories and photos for a quick second.  I remember when I was a kid how excited I was to look through my mom and dad’s old photo albums.  My mom was young with long hair.  Wait, scratch that long hair part… that was my dad.  But I remember looking back at photos of them camping and hanging out with their friends.  I loved it.

Now we all have digital photographs.  What in the world will my kids grab off the shelf to look at?  I do have a ton of scrapbooks from the past, which you will hear about in one second.  But seriously!  This is something that bothers me a little!  Are our children going to say, “Hey Mom, where is your old external hard drive?  I want to browse through a few files of photos from when you were younger!”  Doubtful.  The only reason I looked through my mom’s old photos was because the albums were there.  It makes me sad that things like photographs and memories have all gone digital.

As I just mentioned, I was a scrapbooker.  I think I can say that I have exceeded my scrapbooking days.  I used to be very into the hobby of cutting card stock and using fun stickers to display my photos in an album that eventually became super fat and could barely close.  Every vacation I would take, I would grab odds and ends that would look cute or have just the right touch for my scrapbook.  I did them annually, and for certain events like vacations or graduations.  I loved it. The cost didn’t really matter to me.  I don’t think I ever really realized how expensive that hobby was.  Scrapbooking was definitely my creative outlet for many, many year.

But now I have a ton of scrapbooks on my bookshelf that are simply collecting dust.  I will occasionally look through them, smile, and reminisce, but these albums are big and bulky.  They take up tons of space!  If only they were thinner and smaller I think having several shelves of them wouldn’t be such a bad thing.

Which brings me to my next discovery.  It’s not new, by any means.  I have had friends making these books for years.  Actually my Swiss family has been really good about creating one for every vacation or event they go on.  I just created my first digit (iphoto) album!  And I love it!  I decided I wanted to make an album to summarize the year 2010.  Since I am a Mac User and I love iphoto, it was so incredibly simple.

In the end my book was well over the allotted 20 pages but with the number of photos I take in one year, there is no way I could summarize 2010 in just 20 pages!  My page count wrapped up at 46.  The finished, hard back, large book, including shipping, was about $60 (through Apple).  I know it is probably less expensive through other companies, but it was so easy to use iphoto since all of my pictures were already there.

When I first finished my photo book, before ordering it, I was a little set back about the price.  $60 is a lot to display photos isn’t it?!  Then I started to ponder how much scrapbooking actually cost me.  The album?  Probably $15-ish.  Each colorful background page?  About 50 to 95 cents each.  Printing the photos?  Maybe 10-ish cents each.  All the extra odds and ends that went into the book?  Goodness… beats me.  Oh, and don’t forget the plastic page covers that you put the pages in!  It adds up just as quick!

The front cover of my book.
So simple!  You just click how many photos are on the page
and it gives you several different layout options!

So if you are anything like me, and you LOVE to be creative, you don’t have the time or space to do the scrapbooking anymore, but you still want a way to display your photos… I highly recommend you check this out.  If you don’t use iphoto, check out shutterfly.  I always get coupons in my email box from them!

Next year I think I am going to try to create a calendar with iphoto.  Has anyone ever done this?  I am leaving tomorrow for my vacation in Charleston, SC.  We are doing a photo tour of the city, so maybe when I get home I will have to create a book just for this vacation!! :)

Filed Under: Crafting, diy, Picture This

Easter is in 2 weeks!

April 12, 2011 by Susan 1 Comment

I cannot believe how quickly this year is flying by!  And when I say flying, I pretty much mean soaring!  I’m still stuck in “January World” and just realized that we are already eleven days into April.  That’s almost half way!  That’s almost May!  Which only means one thing… it’s almost Easter!

Somehow the season that revolves around the most miraculous guy ever, Jesus, of course, also revolves around fuzzy little bunnies and pastel colored eggs.  Gotta love it.  If I was the creator of the universe I would totally want to share one of my “big days” with yellow marshmallow peeps.  But if that brings people joy, then I’m all about it.  I’m also all about decorating my house in fun colors!

I saw this project idea on Heather’s blog (turn up your volume if you go to her page, she’s got some lovely tunes playing!)  For Valentine’s Day she did the cutest little project for only a couple of dollars!  Check out these cute little pots with hearts!    So I decided to steal the idea and do it for Easter!  Although, I JUST went back to her blog to get the link and noticed she changed her hearts to the SAME EXACT EASTER EGGS AS I DID! :)  Gotta love the dollar store!  Anyway, check out my version of the project!

The eggs - 5 of them, already on sticks, for $1.

The Flower Foam - All this for $1 and I had plenty left over.  The cute little pots were 3 for $1. 

I simply cut the flower foam to fit into the little pot.  Super easy my friends, not rocket science at all!
Since I’m not a master spray painter I need a plan when it came to the spraying.  I was also way to lazy to go find a card board box to spray them in… 

Twigs seemed to be the best bet. This was Michael’s contribution. :)

The fence was my idea…

Woops.  At least it’s pink though! :)
Crappy picture, I know, but it was getting dark by the time I remembered to take a close up photo!  
Can you see all the eggs on the window sills?  They look super cute when you are walking up to the house!  
So special thanks to Heather for the awesome, inexpensive idea!  I love it!  I can’t wait to change them out with starfish and seashells for summer! :)  Stay tuned for tomorrow’s post with close ups of my Easter Tree also featured in the picture above!  It’s amazing what a few bucks at the Dollar Store can get ya!  (And if you have not been to the Dollar Tree by Sam’s Club in Greenbrier, you need to go!  It’s the best Dollar Store I’ve ever been to!!)

Filed Under: Crafting, diy, Holiday

BEADS!

April 1, 2011 by Susan Leave a Comment

It’s been a while.  I’m so sorry.  My new project blog has been keeping me very busy, along with work and life.  Did you know that it has been raining here (on and off, but mostly on) for almost five days?  And it’s COLD.  Hellooo April I suppose.

Anyway, I wanted to share my craft from last night!  My mom hosted a beading party.  I was a little hesitant when she first invited me, thinking it was going to be one of those parties where you feel pressured into buying something.  Totally not the point.  You have to know, going to this party that you will be spending $20 to MAKE your OWN bracelet.  The lady does not pressure you into buying her stuff, you get to craft and make your own!

I have not been a big fan of the pandora style bracelets.  I hear they are super expensive (like $500 plus!) and yeah, not quite my style.  Honestly, I thought it looked a bit “older generational” but when I got there.  But then I started playing with the beads, I loved it!  I loved it so much that I made (and purchased) two bracelets!

Beading and chatting at my parents house!

The purple and yellow/gold one was my first one!  I went to JMU so of course I would do this color combo!  Everyone loved it, even if they weren’t Dukes! :)

My Grandmother had a great time beading.  She found a red one she loved and tried to duplicate it for herself.  It ended up matching her pretty fingernails very well!

Rennee the bead lady was super helpful!

Tons and Tons of beads kept coming out of her Mary Poppins Style bag!

Sorry it’s blurry, this was my second bracelet.  A bit more summery!  And I even put two charms on the end of it, a bike and a turtle!  So fun!

Filed Under: Crafting, diy

It feels like summer!

March 18, 2011 by Susan 2 Comments

Oh Em Geeeeee.  I LOVE warm weather!!  Did you realize how warm it is supposed to be today?  80 degrees here in Chesapeake, Virginia.  We are finally catching up to the temps that my friends in Australia have been enjoying!  (But it’s such a tease because the next few days will be back in the 50s and 60s again… lame.)

Anyway, before I head to my meeting and then take the top off my jeep (after work… of course…) I wanted to share my It-Feels-Like-Summer Craft!

This one is super easy and I get sooooo many compliments on it!  In 2006 when I traveled to San Antonio, Texas I saw something similar.  When I got home I knew it was going to be on my crafting to-do list!  Check it out:

diy ribbon wreath

Please excuse the fact that it is a little faded (it is several years old…) and the door with paint peeling off of it.  (The neighborhood association has yet to catch me on that!  But it is also on the to-do list, don’t worry.)  So what do you think?  The supplies are simple!

— A grapevine wreath (I got a bunch on sale at Ben Franklins for only a few dollars each)
— Ribbons galore!  All types of colors, prints, patterns!  Whatever your heart desires! (I recommend checking out the dollar section at Michaels… they have some cute, cheap options.)
— And scissors!  That’s it! 
Pick your ribbons!  Like I said, be creative!  I have made a few of these wreaths before.  I love my colorful random one shown here, but it might not match everyone’s houses like it does mine.  I made a red, white and blue one for my mom since her birthday is July 3.  And I made one for a little girls room, with a smaller grapevine wreath, with pink and yellow ribbons.  You can also cut the ribbons to be all different lengths.  Most of my are close in length with a few random, shorter ones.
colorful ribbons

No glue necessary!  All you have to do is double the ribbon and loop it!  Fold it in half and loop it through so it knots on.  Easy Peasey!

ribbon wreath

Scatter the ribbons around so they hang in different parts of the wreath and ta-daaaa!  You’re done!  

diy summer wreath
grapevine ribbon wreath
I guarantee you that you will get compliments on this wreath!  If you make one, send me some photos!  I’d love to see what colors you go with!  

Filed Under: Crafting, diy, Home Projects

  • « Previous Page
  • 1
  • 2
  • 3
  • 4
  • Next Page »
  • 
  • 
  • 
  • 
  • 
  • 
Follow on Bloglovin

Sign up for my Newsletter

Instagram

Looking for something?

Popular Whole30 Posts

  • Birthday Beverages: Whole30 Mocktails

    Birthday Beverages: Whole30 Mocktails
  • Recipe: Whole30 Approved Prosciutto Wrapped Asparagus

    Recipe: Whole30 Approved Prosciutto Wrapped Asparagus
  • Whole30 Approved - Narnie’s London Broil 2.0

    Whole30 Approved – Narnie’s London Broil 2.0
  • Whole30 Results: Day 45 Check-in

    Whole30 Results: Day 45 Check-in
  • Holy Zoodles! Whole30 Paleo Shrimp and Veggie Lo Mein

    Holy Zoodles! Whole30 Paleo Shrimp and Veggie Lo Mein
  • Celebrate Southern: Whole60 Results

    Celebrate Southern: Whole60 Results
  • Whole30 Approved Taco Seasoning (and Salad!)

    Whole30 Approved Taco Seasoning (and Salad!)
  • Day 15: Whole30 Results and Turkey Meatloaf Recipe

    Day 15: Whole30 Results and Turkey Meatloaf Recipe
  • Whole30 Approved Hot Wings!

    Whole30 Approved Hot Wings!
  • Whole30, Paleo Crockpot Chicken Dinner

    Whole30, Paleo Crockpot Chicken Dinner

Categories

2 cats and chloe clean eats, paleo, whole30 glam, classic wedding, glitter wedding diy projects on 2 cats and chloe blog blogger fashion, #whatsuziewears home decor and home style celebrations, parties, creative events travel blog, lifestyle travel Image Map
All content and pictures on this blog belong to Susan Geoghegan and the 2 cats & chloe site, unless otherwise stated. If you pin a picture, please give credit. Gracias!

Connect

A wedding planner, marketing junkie, and blogger. Obsessed with clean eating, glitter and adventures. Whether it is her home, her work, parties, conferences, projects or her style - Susan's goal is to appreciate everything and everyone around her, while making life pretty, one blog post at a time. Read More…

inst-happening!

Full Disclosure: All content and pictures on this blog belong to Susan Geoghegan and the 2 cats & chloe site, unless otherwise stated. If you pin a picture, please give credit. Some links on this site may contain affiliate links. Clicking on these links helps support this blog. A "c/o" in front of a product represents that that product was either gifted to me in exchange for the post or I was compensated by said company for my time. However, all posts are my own thoughts, opinions and reviews! Thanks for your support!

Copyright © 2016 · Foodie Pro Theme by Shay Bocks · Built on the Genesis Framework · Powered by WordPress